Stephen Jackson Basketball Card
- 1. Select a [picture of Stephen Jackson(Basketball) off of google images
- Save the image
- Then open up Photoshop CS3
- Open up the image that you saved
- Using the rectangular Marquee tool select the area that has his body in it(background area is not needed)
- Select Control J while the body is selected ( surface going around the part you want to be in the card) and you will have a new layer
- Go to image-trim-transparent image and it should only be the part you selected
- Layer-Layer Style- Stroke(internal stroke[in drop down menu], size 5, color-gray ,leave all the rest at default settings)
- Then with the rectangular marquee tool select a designated section so you can have an area to put info and other things about him
- Make that a new layer
- Then add a stroke to that layer with the same settings as above (internal stroke[in drop down menu], size 5, color-gray ,leave all the rest at default settings)
- Then select the above area(area with the main part of his face[The other area that does not have a stroke specifically around it
- The stroke will be the same settings but with red instead(look back to step 11)
- You will then select the area that is designated to be written in(the bottom part)
- Again use the rectangular marquee tool to select the area
- Go to edit-fill-and fill it with white
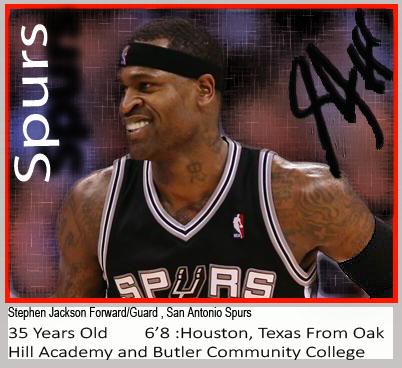
- In your first text box in the area you will type in “Stephen Jackson Forward/Guard, San Antonio Spurs”
- Shrink it after clicking the checkmark in the top right corner
- To shrink it click control T and drag it using the corner so it can fit in right around half of the area about ½ with and ⅘ length
- Then create a new text box and we are going to add some more personal type info
- You will put “35 Years Old 6’8:Houston, Texas” as well as “From Oak Hill Academy and Butler Community College”
- Go to google images and get a picture of stephen jackson’s autograph
- Then open it in photoshop
- Then make it so that there is only the signature by selecting it with the pen tool
- Then go over the signature with the rectangular marquee tool
- While selected go to edit-define brush preset and save it as stephen jackson autograph
- Then go back to the original card
- Select the brush tool
- Then select the stephen jackson autograph brush
- Then put the signature in the top right corner
- Open up a new document that will be the back of the card
- First you will copy the background of white(make sure proportions are the same like the other document)
- Add a stroke to the layer with the exact same settings as earlier stated and gray as the color
- Then add the same stroke on the inner layer that you select with the rectangular marquee tool but make it red
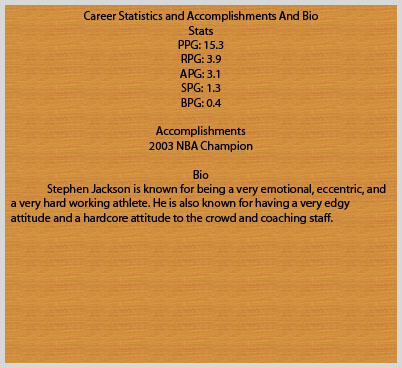
- Then add a text box that says “Career Statistics and Accomplishments And Bio
- Stats
- PPG: 15.3
- RPG: 3.9
- APG: 3.1
- SPG: 1.3
- BPG: 0.4
Bio: Stephen Jackson is known for being a very emotional, eccentric, and a very hard working athlete. He is also known for having a very edgy attitude and a hardcore attitude to the crowd and coaching staff.
- You will then go back to the front part of the card and we are going to make the card more in depth.
- Select the background behind the player
- Then make that into a new layer(ctrl-J)
- You will then go to filter-distort-diffuse glow and make the settings graininess-7, glow amount-12, clear amount-12
- Then select the background and you will go to filter-sharpen-sharpen and then click sharpen more once
- Then make a text box and add the word Spurs in a white font
- Then rotate the text box so it is sideways on the left side of the screen
- Then add a drop shadow to the layer layer-layer style-Drop Shadow(settings: Angle 200, size-13,distance-19 ,spread- 15, contour-half round
- Then again select the background layer and this time make it so that the background is blurred using the settings filter-blur-surface blur and put the settings at radius-20, threshold-32
- Then with the background layer selected filter-sketch-water paper and make the settings(Brightness-70, fiber length-15, contrast-80)
- You have finished the piece Enjoy!
